Showing posts with label Presents. Show all posts

Sunday, January 12, 2014

Haul: What I Got For Christmas

Hey Everyone, 
a few of you said you would be interested in seeing what I got for Christmas this year so I thought I would make a haul post to show you! I am so grateful for everything I received, I am very lucky to have such lovely family and friends!

What did you get for Christmas this year?

Monday, December 9, 2013

Christmas Gift Guide: Wrapping Presents

Hey Everyone,
last year I shared with you how I wrapped my presents along with a little DIY and so this year I thought I'd share how I wrapped a hamper (Hamper Gift Guide HERE!) as well as some images I found on Pinterest to give inspiration for wrapping your presents...

Last week I posted my Gift Guide idea for a Christmas Hamper, so I thought I would show you what it looked like after I had wrapped it. It was really simple to do and I think it makes a lovely present. I lined the basket with tissue paper and filled it with the presents wrapped in two different types of paper. For cylindrical objects I tied twine into a bow at the top to make a half cracker like effect.

I then went searching on Pinterest for some wrapping inspiration for you...

Photograph Tags:
This is such a sweet Idea... Instead of writing names on presents you could attach a photograph of the person or of yourself and the person the gift is for, so they know who it is from.

Leaves and Brown Paper:
You don't have to stick to shop brought gift tags, making your own can be lovely and why not decorate with some festive holly or foliage

Knitted Wrapping:
This is definitely one for the creative, such an amazing alternative to using loads of paper. You could even make a scarf to wrap the present in, a two in one gift.

Paint Splash:
Have fun with your wrapping, getting a roll of cheap brown paper and decorating it with paint or pens is a unique way to stand out from the crowd. It would be especially cute if your children decorated it for other members of the family, so meaningful and a fun job for them to do also. 

Unique Gift Tags:
A few sprigs and twigs from a tree attached to a name tag can be really beautiful and simple ways to tag and decorate a present. Especially if it is from a Christmas tree (they smell amazing also), watch out for the pines though... ouch!

Ornament Tags:
Last but not least is using tree ornaments as tags you could even write the year and the persons name on the ornament to be re-used and something to remind them of you next year when it gets hung on the tree!

How will you be wrapping your presents this year?


Wednesday, December 4, 2013

Christmas Gift Guide: For Him

Hey Everyone,
one of the most common things I hear in the run up to Christmas from friends is that they don't know what to get the men in their lives. I thought I would try and give some inspiration with my 'Gift Guide For Him':

1. PS4:
The talk of the season, however the most pricey present on the list. Last time I check this was pretty much sold out everywhere unless you were one of the lucky ones that pre-ordered it. There is always the option of ordering it anyway and giving them a gift of a game so they know it is on its way.

2. Skincare/Grooming Kits:
This is a such a unique idea, to make up a grooming kit with all their favorites from hair gel to aftershave. If you know someone who is into skincare this could also be a great gift otherwise you could introduce them to it with minis (Boots have a great selection). I love Sapien Men, its Organic and Vegan. It also has a great range and with masculine packaging you really can't go wrong! 

3. DVDs:
Everyone loves to receive some DVD's in their stocking from Santy. Maybe there is a film he wanted to see but missed in the cinema, or that he just wanted to add to his collection. Pacific Rim, World War Z, and Man Of Steel were all popular this year!

4. Foodie:
They say the way to a man's heart is through his belly so why not gift him one of the amazing food gift sets out this year. I love both this Jamie Oliver Set and The Guinness Steak Set, whats even better is he has no excuse not to be cooking up a storm once Christmas is over. 

5. Clothing:
Finally on my 'Gift Guide For Him' is Clothing. He can never have too many clothes, and it's your chance to give him something you like. I would say if you are going to buy clothes make sure its something he will feel comfortable in, from previous experience I can honestly say he won't wear it if he doesn't. T-shirts are always great because they can be styled in his own way like this Stripey Top. This Blue Shirt  is super cool and great for the festive season, as you never know when a last minute night out might happen. Lastly there's always the option of a cute or stylish Christmas Jumper like this Reindeer one from Topman.

What are you getting the men in your life this year?

Wednesday, February 13, 2013

Valentines Day Series: DIY Chocolates

Hey Everyone,
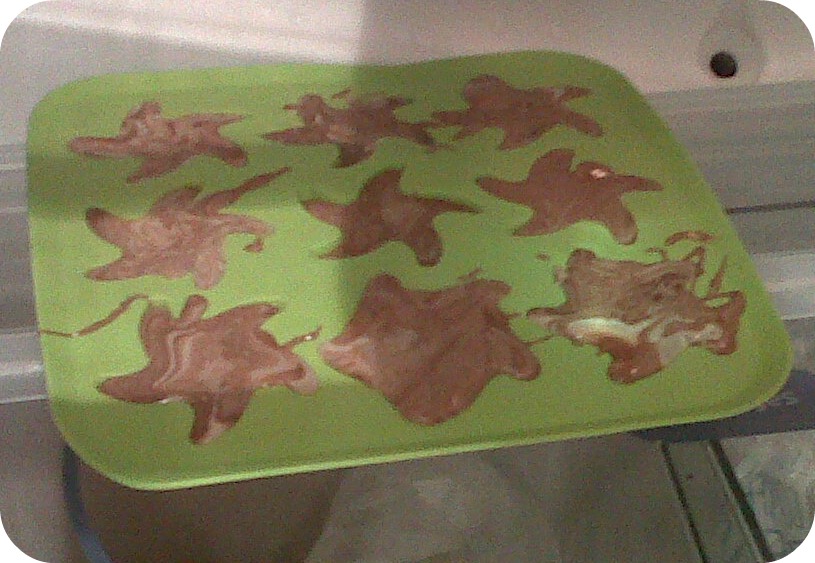
If your looking for a last minute valentines gift for a loved one this is a great idea, something that's quick easy and homemade! I would of liked to make heart chocolates, I went to Ikea but their heart ice cube trays had sold out. Instead I got the star tray which are still nice (and slightly less girly I suppose)! 
What you will need:
1. Chocolate (of your choice)
2. Any filling (Raisins, fruit, honeycomb etc...)
3. Bain-Marie (Bowl on top of a sauce pan of hot water)
4. Mixing spoon
5. Silicon Ice cube tray (Ikea do great shaped ones)
6. Container and decoration

Follow these instructions to make your own chocolates:
Step 1:
 Melt your chosen chocolate in a bowl over hot water (be super careful use a bowl suitable for this... that can take the heat, and if your young get an adult to help!)
Step 2:
 Add in any extras like fruits or a great idea is a mashed up crunchie bar! (I'm folding in a milk chocolate to get a marbled effect!)
Step 3: 
Pour into mold (I'm using a silicone ice cube tray) You may need to repeat the process if you have excess chocolate but only have one set of molds!
Step 4:
 Leave to fully cool and set in the fridge
Step 5:
 Once cooled you can pop the chocolates out and put into a container
Step 6:
 Decorate- (If your wrapping in clingfilm something simple like a ribbon looks pretty!)
I'm putting mine into a jar, covering lid with fabric and then tying on a ribbon!

Other Posts From My Valentines Series:


Finished and Ready to enjoy! What do you think of the homemade chocolates?

Friday, February 8, 2013

Valentines Day Series: Gift Guide For Men

Hey Everyone, 
today's post is a gift guide to help out the ladies this valentines! In my opinion men appreciate it when a woman realises that most men aren't into the whole hearts and flowers aspect of valentines, so this gift guide is to help you out with some manly alternatives! 
1. A Great Fragrance:
An easy but a goody, is a great fragrance! It doesn't take much to just pick up a bottle, and you can pick a smell you love. This Giorgio Armani Eau de Toilette is a perfect pick and one of my favourite scents, it is also available in Boots (HERE!)

2. A Geeky T:
Qwertee offer a range of geek friendly T-shirts, and the best bit about it is a new top comes out every day you then have a day to purchase it before the next one goes on sale! So you have to check back everyday to find one for you! (HERE!)

3. The Beer Lover:
Personalized beer bottles are a great idea for men, it also means you can still give them a gift that they will love avoiding hearts and flowers. There are plenty of labels to choose from... you can then personalize with your own wording and even add images, before selecting the beer you want! (HERE!)

4. For the Wine Connoisseur:
A gadget is always a great idea especially if it means stopping you from stealing all the wine! (HERE!)

5. The Chef:
Naked men and women aprons are so last year LOL! This is a definite must have for the BBQ addict! (HERE!)

6. Activity Day:
I think the best gift is something you can do together, whether its just a night in with a take away and DVD or going out for the day! I don't think you can really go wrong with something to do with driving (unless he can't actually drive that is)! This rally day is something most men would be happy with (HERE!)

Other Posts From My Valentines Series:

What would you add to this gift guide?

Wednesday, February 6, 2013

Hey Everyone,
Today's post is the next in my valentines series...and it is another DIY! This time my DIY addiction has taken me into jewelry making, and this post should show you how to make a cute necklace from some nail varnishes and an old key!
What you will Need:
1. An Old Key (obviously one you don't use!)
2. A Ribbon Or Chain
3. Nail Varnish Colours Of Your Choice, Or Paint 
4. Clear Top Coat 
Follow these steps to make your own key necklace:
Step 1:
Find an old key (obviously one that you don't use anymore!) and give it a quick clean with washing up liquid to remove any residue  
Step 2:
Put down some tissue or newspaper to protect the table, then begin to paint your key
Step 3: 
If your creating an Ombre key like mine use a clear nail varnish to blend or water if your  using paint 
 Step 4:
Complete first coat and hang to dry! (You are probably going to have to do a couple of coats to get the key looking like enamel)
  Step 5: 
Layer up as many coats as you need but don't forget to blend if your creating an ombre effect, and leave the key to dry properly to stop any smudging!
Step 6: 
Once dry apply one top clear coat to seal all the colours, once dry you can hang your key on a chain or ribbon of your choice!
Optional:
You could do any colours, keeping it classically valentines themed with pink/red, creating patterns or heart, or even using glitter!

Other Posts From My Valentines Series:

What do you think of the DIY Key To My Heart Necklace?


Monday, February 4, 2013

Valentines Day Series: DIY Heart Keyring

Hey Everyone,
Today's post is the first from my new valentines series. In this post I will show you how to create a heart keyring through an easy DIY tutorial!
This would be a great inexpensive present for a loved one/family member, plus who doesn't like homemade presents!
 What You Will Need:
1. Coloured Felt
2. Coloured Thread
3. Scissors
4. Pen/Marker
5. Needle
6. Stuffing
7. Keyring
Follow these simple steps to make your keyring:
Step 1:
 Fold your felt in half and mark out your shape (make sure your drawing on the back of the fabric so it won't be seen!)
Step 2: 
Cut out your shape (because the fabric was folded in half you should end up with two shapes)
Step 3: 
Put the cut out shapes on top of each other and sew together (I used a blanket stitch but you can use whatever stitch you know) ...Leave a small gap for stuffing!
Step 4: 
Now you can fill your shape with stuffing, Wadding, Cotton wool, Tissue, or left over felt are all fine!
Then close up the gap by continuing your stitching!
Step 6: 
Attach your keyring by creating a loop at the top of your shape and then knotting the thread! 

Other Posts From My Valentines Series:

What do you think of the Heart Keyring?

Sunday, February 3, 2013

Valentines Day Series: Introduction

Hey Everyone,
This post is just a quick introduction to my valentines series it will include lots of gift ideas, and DIY! Don't worry I won't be rambelling on about fluffy, cheesy, lovey dovey stuff just you wait and see! 

The posts will be starting tomorrow and ending on valentines day! You can check back here for links of posts as they go live, as well as at the bottom of each post in the series! 

...and don't forget you don't have to have a boyfriend/girlfriend or be married to enjoy the day, just appreciating friends, family, and other loved ones can be just as nice!

Other Posts From My Valentines Series:

What do you think of valentines day?

Monday, December 31, 2012

What I Got For Christmas...

Hey Everyone,
So I know some people don't like these posts but I asked, someone said yes, so I figured hopefully the nosy people out there (like myself!) might want to see this! (I'm sorry if your not a fan of this type of post just don't read on, and they'll be another post up for you tomorrow!)

I was very lucky this year and got lots of amazing pressies  Some things haven't arrived yet as I got vouchers or money and did some online shopping, but I'll try to insert images of those things! Anyway enough rambling here's what I got...

 Let Me know if you would like reviews of anything! What did you get for Christmas?

Saturday, December 29, 2012

My Christmas

Hey Everyone,
I've been a bit short on posts over the holidays because I've been staying at home where its a lot harder to upload! but I thought I would share a few pictures of my Christmas at home with you...
Let me know if you would like me to do a haul of what I got for Christmas!
How did you spend your holidays?

Saturday, December 15, 2012

Gift Idea: Christmas Care Package

Hey Everyone,
So just one more gift ideas post before Christmas, and its the best one of all!
It's my Christmas Care package! 
Unfortunately I haven't been able to do it this year, (due to the fact that i'm STILL job hunting) but this is usually the way I go when buying for my close friends! 
I think grabbing a box and filling it with lots of treats is just the perfect way to treat your friends or sisters, and literally can be adapted anyway to make it suitable for anyone as its your choice what you put in it!
 Here's a few ideas from me!...


Have you created a care package for someone this Christmas?

Friday, November 30, 2012

DIY: Simple and Cute Personalized Present Tag

Hey Everyone, 
Today's Post is a follow up from my Vintage style wrapping in my last post which you can find HERE! 
Its a really simple way of making a personalized Tag to put on your presents! 

You Will Need:
Garden Wire/ Or another type of wire
Twine or String
Metallic Paint of your choice

Making the Tag:
1. Make a loop with wire
2. Wrap Wire around the loop to stiffen and create extra strength
3. Snip of the end of the wire and shape (you could create stars, trees, hearts, or whatever you can think of!)
 4. Wrap your chosen twine or string all the way around the shape 
 5. Then wined in and out the shape building up the shape to make it 3D, Make it as neat or shabby chick as you want!
 6. Knot the end of the string to another piece within the shape 
7. Pour out some of your chosen paint put some on your finger or a brush dab off onto tissue to get rid of excess then dab onto the shape 
 8. Leave to dry then attach to your present! 

So What do you think? Are you personalizing your presents in anyway?